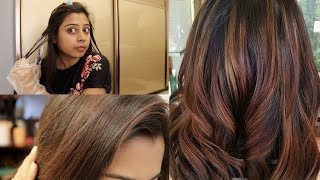
How to Achieve Beautiful Brown Highlights at Home
Choosing brown highlights can add depth, warmth, and a natural glow to any hair colour. Whether you want a subtle caramel lift or a richer golden‑brown finish, you can create salon‑like results without stepping out the door. Below is a step‑by‑step guide that combines proven techniques with easy‑to‑find products, perfect for beginners who want a DIY hair transformation.
What You’ll Need
- Brown highlighting kit (choose a shade that matches your base colour – e.g., caramel, golden brown, mocha)
- Colour‑safe shampoo and conditioner
- Wide‑tooth comb and sectioning clips
- Gloves, plastic cape, and a timer
- Foil strips or a cap‑highlighting kit (for a faster, “cap girls” method)
- Optional: Garnier hair‑care products for post‑colour protection
Preparing Your Hair
For the best results, start with clean, dry hair. Wash your hair with a colour‑safe shampoo, then let it air‑dry completely. This removes oils that can interfere with the dye’s absorption. If your hair is very oily, a light pre‑wash the night before can help.
Protect Your Skin
Apply a thin layer of petroleum jelly along your hairline and behind your ears. This prevents staining and makes the cleanup easier.
Step‑by‑Step Brown Highlight Process
- Section Your Hair – Divide your hair into four quadrants using the clips. This makes the application smoother and ensures even coverage.
- Mix the Colour – Follow the instructions on the kit to combine the developer and colour. Mix only the amount you’ll need for the session.
- Apply the Highlights –
- For a balayage‑style look, use a wide‑tooth comb to pull small sections of hair away from the scalp. Apply the colour from the mid‑length to the ends, leaving a natural gradient.
- For a quick cap‑girls method, place the cap on your head, pull strands through the holes, and apply colour directly onto the exposed hair.
- Wrap and Wait – If you’re using foil, wrap each highlighted strand in foil to keep the heat in. Set a timer for the recommended processing time (usually 20–30 minutes).
- Rinse and Condition – Rinse with cool water until the water runs clear. Apply the included conditioning treatment or a colour‑protecting conditioner like Garnier’s Color Shield to lock in moisture.
- Dry and Style – Gently towel‑dry, then blow‑dry using a medium heat setting. Finish with a light serum for