Introduction to the Hair Dye Cap
Achieving salon-quality highlights at home has never been easier, thanks to the humble hair dye cap. This simple yet effective tool, sometimes called a highlighting cap or dimension cap, allows you to precisely control where color goes. We are a small team of beauty enthusiasts who love sharing professional techniques, and we’ve found that a hair dye cap can transform your coloring routine from messy guesswork into a clean, step-by-step process. Whether you are aiming for subtle sun-kissed strands or bold streaks, mastering the hair dye cap tutorial will open up a world of creative possibilities.
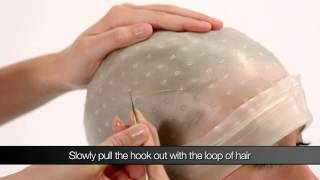
The hair dye cap is essentially a tight-fitting plastic or rubber cap with hundreds of tiny holes scattered across it. By pulling strands of hair through these holes with a special hook, you isolate specific sections for color application. This method is especially popular for frosting, babylights, and other dimensional effects. It has also taken social media by storm, with viral clips showing satisfying results and professional stylists using it to recreate trendy looks.
What You Will Need
Before diving into the tutorial, gather the following supplies to ensure a smooth experience:
- A hair dye cap: Available at beauty supply stores or online. Choose one with holes spaced according to the look you want—closer holes for finer highlights, wider spacing for chunkier streaks.
- A highlighting hook: This tool has a small loop or hook at the end to gently pull hair through the cap holes.
- Hair dye or lightener: Your chosen color formula. Permanent or semi-permanent dyes work well, but a bleach-based lightener is