How Do You Get Internet On Smart TV: A Step‑by‑Step Guide
Whether you own a Samsung, LG, Sony, or any other brand, getting online on a smart TV is straightforward once you know the options. You can use a Wi‑Fi network, plug in an Ethernet cable, or even share your smartphone’s data. This guide walks you through each method, giving you the confidence to stream, browse, and enjoy all the smart features your TV offers.
Understanding Your Connection Choices
Before you start, it’s helpful to know the three most common ways to bring internet to a smart TV:
- Wi‑Fi (wireless) – Ideal for homes without running cables. Most modern TVs have built‑in Wi‑Fi that can connect to your home router.
- Ethernet (wired) – Provides a stable, high‑speed link, especially useful for 4K streaming or when Wi‑Fi signals are weak.
- Mobile hotspot – Perfect for apartments or temporary setups where a traditional router isn’t available.
Connecting via Wi‑Fi
1. Prepare Your Network
Make sure your router is powered on and broadcasting a 2.4 GHz or 5 GHz network. Have the SSID (network name) and password handy.
2. Access the TV Settings
- Turn on the TV and press the Home or Menu button on the remote.
- Navigate to Settings > Network (or Connections on some models).
- Select Wireless or Wi‑Fi.
3. Join Your Network
- From the list of available networks, choose your SSID.
- Enter the password using the on‑screen keyboard. Use the remote’s directional pad or a connected Bluetooth keyboard for faster entry.
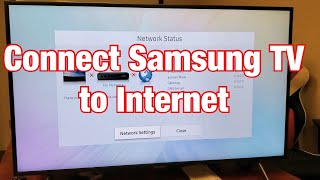
- Confirm the connection. The TV will display a “Connected” status and may run a quick network test.
Most Samsung smart TVs will automatically detect the connection and prompt you to sign in to your Samsung account, unlocking apps like Netflix, YouTube, and Amazon Prime.
Connecting via Ethernet Cable
Why Choose Wired?
An Ethernet cable (usually Cat5e or Cat6) delivers a reliable, low‑latency link. This is especially important for gaming, live sports, or high‑bitrate 4K streams.
Step‑by‑Step Setup
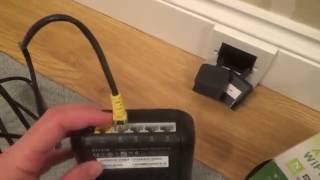
- Locate the Ethernet port on the back or side of your TV. It looks like a larger phone jack.
- Plug one end of the cable into the TV and the other end into an available LAN port on your router or switch.
- Power on the TV and go to Settings > Network.
- Select Wired or