How To Get Cable On A Smart TV: A Step‑by‑Step Guide
Connecting cable TV to a smart television can seem daunting, but with the right equipment and a clear plan, the process is straightforward. This article walks you through everything you need to know—from preparing your hardware to scanning for channels—so you can enjoy live TV, sports, and news directly on your smart TV’s interface.
1. Gather the Required Equipment
Before you start, make sure you have the following items on hand:
- Cable service active – Your provider must have an active subscription for the channel lineup you want.
- HDMI or coaxial cable – Most modern smart TVs use HDMI for the best picture quality, but older sets may still rely on coaxial (RF) connections.
- Digital cable box or tuner – Some smart TVs have a built‑in tuner; if yours does not, you’ll need an external set‑top box.
- Remote control – You’ll need the TV remote and, if applicable, the cable box remote.
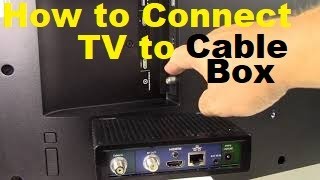
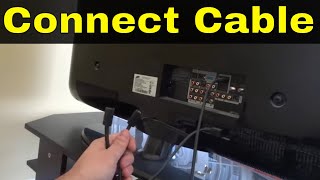
2. Connect the Cable Box to Your Smart TV
Follow these steps to make the physical connection:
- Locate the HDMI OUT port on your cable box.
- Plug one end of an HDMI cable into the box and the other end into an available HDMI input on your TV.
- If you’re using a coaxial cable, connect the cable’s coaxial connector to the TV’s ANT IN (antenna) port, then run a short HDMI cable from the TV’s internal tuner to the HDMI input you’ll use.
- Power on both the TV and the cable box.
Tip: Use a high‑speed HDMI cable (Category 2 or higher) to avoid signal loss and ensure 4K compatibility if your TV supports it.
3. Select the Correct Input Source
Using your TV remote, press the Source or Input button and choose the HDMI port you connected the cable box to (e.g., HDMI 1). The screen should display the cable box’s startup screen. If you see a blank picture, double‑check the cable connections and make sure the cable box is turned on.
4. Scan for Channels
Many smart TVs allow you to scan for channels directly, even when a cable box is attached. Here’s how to do it on most LG models (the steps are similar on Samsung, Sony, and Vizio):
- Press the Home button on the remote and navigate to Settings.
- Select All Settings > Broadcast > Channel Scan.
- Choose Antenna if you’re using a coaxial connection, or Cable if your TV has a built‑in tuner that receives


![[LG WebOS TVs] How To Connect A Cable or Satellite Box To Your LG TV - WebOS 6.0](https://i.ytimg.com/vi/wxx5A219r1o/mqdefault.jpg)