Samsung Smart TV Wi‑Fi Setup: A Complete Walkthrough
Getting your Samsung Smart TV online is the first step toward streaming movies, browsing the web, and using thousands of apps. In this article we’ll show you how to connect your Samsung Smart TV to Wi‑Fi quickly and securely, whether you’re setting up a new TV or adding a network to an existing one.
What You Need Before You Start
- Wi‑Fi network name (SSID) and password – make sure they are entered exactly as they appear on your router.
- Remote control for your Samsung Smart TV.
- Access to the TV’s Settings menu – most models use the Home button.
- Optional: A smartphone or computer to verify the network’s internet connection.
Step‑by‑Step Samsung Smart TV Wi‑Fi Setup
- Power on the TV and open the Home menu. Press the Home button on the remote, then navigate to Settings (gear icon).
- Select “General” or “Network.” On newer models the option is labeled Network; older sets may list it under General > Network.
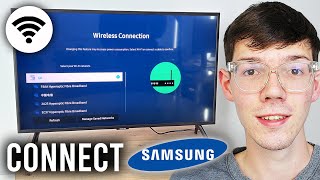
- Choose “Open Network Settings.” This opens a submenu where you can pick Wireless or Wired. Choose Wireless.
- Scan for available networks. The TV will display a list of nearby Wi‑Fi networks. Locate your SSID and highlight it with the remote.
- Enter the password. Use the on‑screen keyboard to type your Wi‑Fi password. Pay attention to case‑sensitivity and any special characters.
- Confirm the connection. After entering the password, select Done or Connect. The TV will attempt to join the network. A confirmation message will appear once the connection is successful.
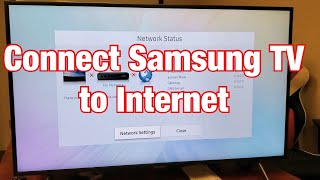
- Test the connection. From the same menu, select Network Status to see if the TV can reach the internet. You should see “Connected” and a ping test result.
Quick Tips for a Smooth Setup
- Place the router within 10‑15 feet of the TV. Walls and metal objects can weaken the signal.
- Use the 5 GHz band if your router supports dual‑band. It provides faster speeds for streaming 4K content.
- Make sure your TV’s firmware is up to date before starting. Settings > Support > Software Update will check for the latest version.
- If you have a “guest” network, avoid it. Some Samsung Smart TVs require a primary network with full internet access.
Common Issues and How to Fix Them
Even a straightforward setup can encounter hiccups. Below are the most frequent problems and simple solutions.


![Fix- Samsung Smart TV Wi-Fi Not Working! [Not Connecting]](https://i.ytimg.com/vi/qJ1FqcANM9E/mqdefault.jpg)