Smart Hard Drive Test: Why It Matters and How to Run One
Modern computers rely heavily on storage reliability. A failing hard drive can cause data loss, system crashes, and costly downtime. The S.M.A.R.T. (Self‑Monitoring, Analysis and Reporting Technology) feature built into most HDDs and SSDs provides a proactive way to assess drive health. Running a Smart Hard Drive Test regularly helps you catch problems early, plan replacements, and keep your data safe.
What Is S.M.A.R.T. and How Does It Work?
S.M.A.R.T. continuously records a variety of internal metrics such as:
- Read/write error rates
- Spin‑up time (for rotating drives)
- Reallocated sector count
- Temperature and power‑on hours
When any of these parameters exceed predefined thresholds, the drive flags a warning. The information is stored in the drive’s firmware and can be accessed by diagnostic software. Because the data is collected in real time, a Smart Hard Drive Test can reveal issues before they become visible to the operating system.
When Should You Perform a Smart Hard Drive Test?
Although S.M.A.R.T. runs automatically, a manual test is useful in the following situations:
- After a power outage or system crash – sudden power loss can cause temporary errors that S.M.A.R.T. may not flag immediately.
- When you notice slow performance or frequent freezes – these symptoms often correlate with growing bad sectors.
- Before a major OS upgrade or hardware change – verifying drive health reduces the risk of data corruption during migration.
- On a regular schedule – many experts recommend a quarterly test for desktop machines and a monthly test for servers.
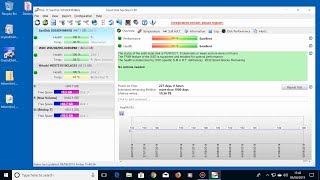
How to Run a Smart Hard Drive Test on Windows
Windows includes built‑in tools, but third‑party utilities provide a clearer view of S.M.A.R.T. data.
- Using Command Prompt
- Open Command Prompt as administrator.
- Enter wmic diskdrive get status.
- If the output shows OK, the drive passed the basic S.M.A.R.T. check.
- Using PowerShell
- Run Get-PhysicalDisk | Select-Object FriendlyName, OperationalStatus